
2
3
4
5
Bandana
Yapılışları içerde...
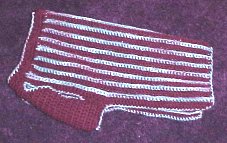
Model 1:

DOG SWEATER CROCHET PATTERN:
MATERIALS and TOOLS USED
I used 100% Virgin Acrylic Fiber, 4-ply knit and crochet yarn 3 oz.
For larger sizes you will want to use 4, 5 and 6 oz, corresponding to the number of additional stitches shown below. However, be aware that if you use another type of yarn, the amount needed may be different. Tip: It's always better to have more than you think you'll need on hand so that you have yarn from the same dye lot.
I used a crochet hook size 7 (4.5 mm) to get a gauge of 4 dc to just under an 1 inch (25 mm) across and a row height of 3/4 inch or 19 mm. Make a test swatch of 10 stitches across and four rows high to see whether your gauge comes close or not. If not, you can switch to either a different size yarn or a different size hook and try again, OR just measure how many more or less dc you make per inch and adjust the number of stitches accordingly.
Three 3/4 inch (18-20 mm) buttons
Yarn needle
DOG SWEATER CROCHET PATTERN: STITCHES USED
double crochet (dc) – YO, insert hook in next st, YO, pull through 2 loops, YO draw through 2 loops. When inserting the hook, I usually pick up the first loop of the stitch facing me, not both loops, for a smoother effect.
decrease ( uses next 2 sts) - * YO, insert hook in next st, YO and pull up a loop, YO and draw through 2 loops on hook, repeat from * once more, YO and draw through all 3 loops on hook. (counts as 1 decrease)
front post double crochet (FPdc) - YO, insert hook from front to back around post of st indicated, YO and pull up a loop even with loop on hook, (YO and draw through 2 loops on hook) twice, skip st behind Fpdc.
Body
Ch 28(31, 34, 37) loosely.
Row 1: Dc in 4th ch from hook and in each ch across. 26 (29, 32, 35) sts.
Row 2: (Right Side) Ch 3, (counts as first dc now and throughout) turn, dc in next dc, ( work FPdc around next dc, dc in next 2 dc) across; 8 (9, 10, 11) FPdc
Row 3: ( Increase Row) Ch 3, turn, dc in next dc, dc across to last st, 2 dc in last dc, 28 (31, 34, 37) sts.
Row 4: Ch 3, turn, (dc in next 2 dc, work FPdc around next st) across to last 3 dc, dc in last 3 dc.
Row 5: (Increase Row) Ch 3, turn, dc in next dc, dc across to last st, 2 dc in last dc: 30 (33, 36, 39) sts.
Row 6: Ch 3, turn, work FPdc around next st, ( dc in next 2 dc, work FPdc around next st) across to last dc, dc in last dc.
Row 7: ( Increase Row) Ch 3, turn, dc in next dc, dc across to last st, 2 dc in last dc: 32 (35,38,41) sts.
Row 8: Ch 3, turn, dc in next dc, (work FPdc around next st, dc in next 2 dc) across.
Rows 9-11: Repeat rows 3-5: 36 (39, 42, 45) sts.
Additional rowsRepeat row 6 for a total of 21(25, 29, 33) rows, or until the length is from the base of your dog's tail to the middle of his/her shoulders.
DOG SWEATER CROCHET PATTERN: THE NECKBAND
Right Neck Shaping
Note: Maintain established pattern throughout. Row 1: Ch 3, turn, work across next 13 (14, 15, 16) sts, leave remaining sts un-worked, 14 (15, 16, 17) sts.
Row 2: (Decrease Row) Ch 3, turn, decrease, work across: 13 (14, 15, 16) sts.
Row 3: (Decrease Row) Ch 3, turn, work across to last 3 sts, decrease, dc in last dc: 12 (13, 14, 15) sts.
Row 4-7: Repeat Rows 2 and 3 twice: 8 (9, 10, 11) sts.
Row 8: Work across and finish off.
Left Neck Shaping

Row 1: With right side facing, skip 8 (9, 10, 11) sts from Right Neck Shaping and join yarn with a slip st in next st; ch 3, work across: 14( 15, 16, 17) sts.
Row 2: (Decrease Row) Ch 3, turn, work across to last 3 sts, decrease, dc in last dc. 13( 14, 15, 16) sts.
Row 3: (Decrease Row) Ch 3, turn, decrease, work across: 12( 13, 14, 15) sts.
Row 4-7: Repeat rows 2 and 3 twice. 8 (9, 10, 11) sts.
Row 8: work across and finish off.
Neckband
Rnd 1: With right side facing and MC, join yarn with slip st at seam; ch 1, sc evenly around, join with slip st to first sc.
Rnds 2 &3: Ch 1, sc in each sc around, join with slip st to first sc.
Finish off.
DOG SWEATER CROCHET PATTERN: FINAL STEPS
Belly Band
Slip the neckband over your dog's head and put the sweater in place.
Take a short piece of contrasting yarn and mark the row about half an inch behind the legs. This is where you will start your belly band.
Take another piece of yarn and mark the spot where you want your belly band to end (towards the rear of the dog).
Row 1: With right side facing, working in end of rows and using MC, join yarn with slip st on left edge of Sweater at your first yarn marker; ch 3, dc in same st, 2 dc in the ends of each of the next number of rows until you reach your yarn marker.
Row 2: Ch 3, turn, dc in next dc and in each dc across.
Additional rows: Repeat Row 2 until the belly band fits snugly around your dog's tummy. Check and double check for fit.
Now it's time to add the buttonholes.
Buttonholes
Row 1: Ch 1, turn, sc in each dc across.
Row 2: Ch 1, turn sc in first 3 sc, (ch 2, skip 2 sc, sc in next 3 sc) twice.
Row 3: Ch 1, turn, sc in each sc and in each ch across.
Row 4: Ch 1, turn, sc in each sc across, finish off.
Sew on buttons.
Ta da! You've completed this dog sweater crochet pattern!
Kaynak
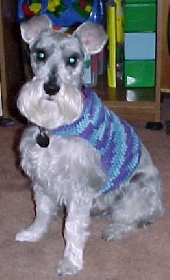
Model 2

MATERIALS:
G Hook
Red Heart Super Saver - 4 ply worsted weight
MC = Burgundy
Red Heart Maypole - 4 ply worsted weight
CC = Blue 'n Berry
Stitches: ch, sc, sc dec, dc, dc dec, rev sc.
Difficulty: MEDIUM/DIFFICULT
NOTE: Dog Sweater is started using the MC. Alternate MC & CC every 2 rows for main body of sweater. Work the rest of the sweater except for finishing in MC. Work finishing in CC.
Row 1: Ch 58, Sc in hump of 2nd ch from hook. Sc in the hump of each rem ch. Ch 1, turn.
Rows 2-65: Sc in the BL only of ea sc across. Ch 1, turn.
Row 66: Sc in the BL only of ea sc across. Ch 5 (this ch-5 will be referred to later as the "connecting chain")
NECK: Fold piece with Row 1 by Row 66 and join with a sl st on the first st on Row 1.
Rnd 1: Ch 1, turn. Sc in end of ea row and in each ch on connecting chain. Join with sl st in 1st sc. Ch 3, turn.
Rnd 2: (Dc dec over next 2 sts) around to connecting chain. Dc in ea ch on the connecting chain. Join with sl st. Fasten Off.
CHEST PIECE:
Row 1: Attach yarn on the first stitch on the first ch of the connecting chain. Ch 1, work 1 sc in ea st on the connecting ch. Ch 1, turn.
Rows 2-4: Sc in ea st. Ch 1, turn.
Rows 5-9: 2 sc in 1st st, sc in each rem st across to last st. 2 sc in last st. Ch 1, turn.
Rows 10-15: Sc in ea st. Ch 1, turn.
Rows 16-20: 2 sc in 1st st, sc in ea rem st across to last st. 2 sc in last st. Ch 1, turn.
JOIN CHEST TO BODY…
Count 20 stitches down each side of the body from the neck and place a marker in each for reference. Join with a sc on the body on the same side as your last stitch. Sl st in the next st on body, turn.
Repeat Row: Sc in each st across chest piece. Sc in in the marked st on that side of the body. Sl st in the next st on body.
Now work the repeat row until the sweater covers as much of your dog's chest as you want it to. For the finishing row on the chest work a sc dec over every 2 sts across. Then fasten off.
FINISHING
Work Rev Sc stitches around the entire sweater… neck edge, arm hole edges and around the bottom of the sweater also.
Fasten Off.
Kaynak
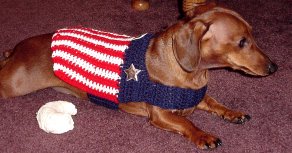
Model 3
This is Schotzi (my dog)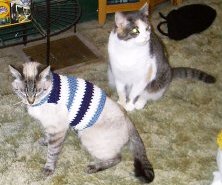 Photo courtesy of Angie Wilson. These are her two cats. |  Photo courtesy of their owner, Linda Fleisch. Thanks Linda! Get Linda's Version of the Dog Sweater Pattern 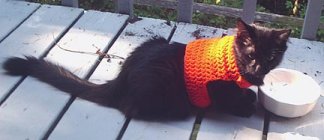 Basil - Photo courtesy of Iris. Basil - Photo courtesy of Iris. |
SWEATER SIZE: Approximately 8" from neck to waist.
SCHOTZI'S MEASUREMENTS: Approximately 15 1/2" tall; 22" from head to tail; 11 1/2" around his neck & 19 1/2" around his waist. (I hope these measurements help you in fitting your own dog.)
MATERIALS:
Hook: Size G (I use Boye brand)
Yarn: 2-3 ounces of any 4ply worsted weight yarn.
(I used Keepsake Sayelle for the sweater in the photo)
Stitches used: ch, sl st, hdc.
Difficulty: Easy (since there are no leg holes to shape)
RND 1: Chain 70, join with sl st being careful not to twist the chain. Ch 2, hdc in next ch and in each ch around. Join with sl st in top of beg ch 2. Ch 2. DO NOT TURN.
RND 2-12: Hdc in next st and in each st around. Join with sl st in top of beg ch 2. Ch 2. DO NOT TURN.
RND 13: Sl st in the next 20 sts. Ch 2, hdc in next 39 sts (40 hdcs including beg ch 2). Ch 2, TURN.
ROWS 14-20: Hdc in each hdc, ch 2, TURN.
RND 21: Hdc in each hdc, ch 16, DO NOT TURN. Join with sl st to opposite side of row just completed.
Ch 2.
RND 22: Hdc in each st and ch around. Join with sl st in top of beg ch 2. Ch 2, DO NOT TURN.
RNDS 23-24: Repeat rnd 22.
FASTEN OFF.
WEAVE IN ALL YARN ENDS.
ADJUST THIS PATTERN FOR YOUR DOG
This dog sweater pattern can be easily altered to fit your little one. It begins around the waist.
You should chain enough chains to go around your dogs waist. Then join the chain. Finish RND 1.
You should do only the number of rounds it takes (in place of rnd 2-12) to go up to just behind your dogs front legs.
Then for rnd 13 do sl sts (remember how many for rnd 21) for how wide the dog's chest is (from the outside of one leg to the outside of the other) and then hdc in each remaining stitch.
(rows 14-20) You begin working hdcs back and forth in rows). Do ever how many rows it takes to reach above your dog's legs...by the base of the dog's neck.
(rnd 21) hdc in each hdc and then where it says ch 16 you should chain the same number as you did sl sts in rnd 13. Then finish the rnd.
complete rnd 22, 23 & 24 and finish off.
I've gone over this pattern pretty quickly but Linda (whose little cuties are pictured above) was nice enough to test this for me and she said it works out pretty well with my adjusted directions... so I hope I'm explaining how to reduce this pattern well enough for you to make them for your babies. It's really a simple pattern. Kind of plain, but you can dress it up by using different colors on certain rows or something. You could even add a pocket (not that the dog would use it) or some other type of decorative applique.
Let me know if you're successful in interpreting my altered directions and if you have a photo of your cuties that you'd like displayed just email me.
COMMENTS:
I think in row 13 it should be sl 30 st and not 20. (otherwise it doesn't sum up to 70 stiches from the beginning.)
Thanks for the nice pattern,
Malka
<< reply >>
Round 13 doesn't total 70 stitches because all the stitches aren't actually used.
You slip stitch in 20, then half double in 40 and the other 10 stitches are left unworked.
I did that to keep the "join" line in the rounds underneath the dog.
HAPPY CROCHETING
Kaynak
Model 4
Worsted Weight Yarn
Colors: Red, White, And Blue
Hook Size: G
Notes: Change colors by finishing last part of DC with new color, drop 1st color, work over end of 1st color and beginning strand of new color. After 6 or 7 stitches, cut 1st color and trim new color.
Cape:
With Red, Chain 21.
Row 1: DC in 2nd chain from hook and in each chain across switch to white yarn on last part of last DC, chain 2, turn (20 DC)
Row 2: With white, (Chain 2 counts as 1st DC - do not DC in 1st stitch) DC in each DC across to last DC, 2 DC in last DC. Change to Red, chain 2, turn. (21 DC)
Row 3: With red, (Chain 2 counts as increase) DC in each DC, including 1st DC across. Change to White, Chain 2, turn (22 DC)
Row 4: Same as 2 (23 DC)
Row 5: Same as 3 (24 DC)
Row 6: Same as 2 (25 DC)
Row 7: Same as 3 (26 DC)
Row 8: Same as 2 (27 DC)
Row 9: Same as 3 (28 DC)
Rows 10-13: Work even changing from red to white to red, etc. (28 DC)
Row 14: With white, (Chain 2 counts as 1st DC - do not DC in 1st stitch) DC in each DC across to last 2 DC, DC decrease over last 2 stitches, change to red, chain 2, turn, (27 DC)
Row 15: With red, (Chain 2 counts as 1st DC, do not DC in 1st stitch) DC decrease over next 2 stitches, DC across, change to white, chain 2, turn, (26 DC)
Row 16: Same as 14 (25 DC)
Row 17: Same as 15 (24 DC)
Row 18: Same as 14 (23 DC)
Row 19: Same as 15 (22 DC)
Row 20: Same as 14 (21 DC)
Row 21: With red, (Chain 2 counts as 1st DC, do not DC in 1st stitch) DC decrease over next 2 stitches, DC across, change to blue, chain 1, turn, (20 DC)
Under belly strap:
Row 22: With blue, SC in 1st 10 DC stitches, chain 3, turn (10 DC)
Row 23: (Chain 3 counts as 1st DC from now on) Work even, chain 3, turn (10)
Row 24 - ?? Continue Row 23 until strap fits dog. Make strap snug but not real tight, leave a little breathing room. (on last row of DC, chain 1 instead of 3)
Last row: SC in each DC across, Finish off leaving 12" length of yarn. With tapestry needle sew to other side of jacket.
Yoke, (Chain 3 counts as 1st DC)
Row 1: With Blue, Work 40 DC stitch on straight edge of cape. Chain 3, turn. (40 DC)
Row 2: DC decrease in next 2 stitches, DC across to last 2 DC, DC decrease over last 2 DC. Chain 3, turn. (38 DC)
Row 3 - ?? Continue with row 2 until yoke comes over shoulder blades (for Buddy, it was 5 rows). Do not finish off, continue next row w/ front strap.
Front strap:
Next row: DC in 1st 7 DC, chain 2, turn.
Continue rows with 7 DC until strap fits across lower neck, chest area in front of legs. Fasten off as in belly strap, leaving 12" length of yarn. Sew to other side of yoke.
Attach fabric stars to yoke. Work in ends.
To make cape bigger, increase beginning chain to length desired and increase at rows 10-13 to desired width.
I chained 2 after each row on the cape instead of 3 to make the stitches tighter on the ends. If your work is usually really tight anyway, you may want to do chain 3's.
HAPPY CROCHETING
Kaynak
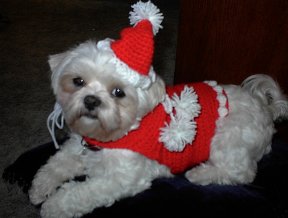
Model 5
Giget's Santa Sweater and Hat
Santa Sweater Trim (bottom)
With body opening toward you and working in free loops of beginning chain on round 1 of bottom of sweater, join white with slip st in any chain (on the under part of sweater); ch 3, dc in next sc, work Bobble in next sc, (dc in next 2 sc, work Bobble in next sc) around; join with slip st to first dc, finish off. Then after I finished the bobble row, I added a row of red slip stitches over the bobble to make the end of the sweater red as Giget has white fur and I thought it would show up better.
Bobble
YO, insert hook in sc indicated, YO and pull up a loop, YO and draw through 2 loops on hook; repeat from * 3 times more, YO and draw through 4 loops on hook, YO and draw through remaining 2 loops on hook.
Neck Trim
All I did was work the sc sideways in the last row of hdc – so you sc, then chain three, skip sc, sc in next sc, chain three around neck.
I also made a little tie to go around the neck. Crochet a chain the length of the neck plus more to be able to tie a bow and have extra to hang down and add pom poms. Then weave the chain (before you add the pom poms) around the last row picking up two hdc at a time around. This little tie made the neck fit better on Giget.
Santa Hat
Rnd 1 (right side): with red, ch 2, 4 sc in second ch from hook; do not join, place marker.
Rnd 2: (sc in next sc, 2 sc in next sc) twice: 6 sc
Rnd 3: sc in each sc around
Rnd 4: (sc in next sc, 2 sc in next sc) around: 9sc
Rnd 5: (sc in next 2 sc, 2 sc in next sc) around: 12 sc
Rnd 6: sc in each sc around
Rnd 7: (sc in next sc, 2 sc in next sc) around: 18 sc
Rnd 8-10: sc in each sc around
Rnd 11: (sc in next 5 sc, 2 sc in next sc) around: 21 sc
Rnd 12: sc in each sc around
Rnd 13: (sc in next 6 sc, 2 sc in next sc) around: 24 sc
Rnd 14: sc in each sc around
Rnd 15: (sc in next 3 sc, 2 sc in next sc) around: 30 sc
Rnd 16: sc in each sc around
Rnd 17: sc in each sc around changing to white in last sc
Rnd 18: sc in each sc around; slip st in front loop only of next sc.
Rnd 19: ch 3, turn; working in back loops only, dc in next sc, work bobble in next sc, (dc in next 2 sc, work bobble in next sc) around; join with slip st to first dc, finish off
Add a pom pom on the top and bend the top down a little and tack it that way to look like a Santa hat.
HAPPY CROCHETING
Kaynak
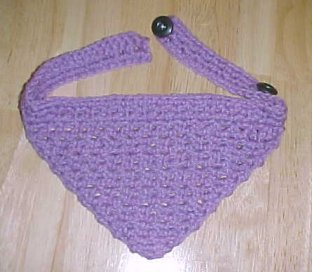
Bandana
MATERIALS:
Red Heart 4 ply WW Yarn
(I used a shade of purple... you can use the color of your choice.)
Hook Size G
Stitches: ch, sl st, sc.
Difficulty: EASY
BAND
R1: Ch70. Sc in hump of second ch from hook. Sc in the hump of ea rem ch. (69sc)
R2: Ch1, turn. Sc in first st. (Ch1, sk next st, sc in next st) across.
R3: Ch1, turn. Sc in ea st and in ea ch1 sp.
Fasten off.
R4: Reattach yarn in the 20th st from where you fastened off. Ch1, sc in same st.
(Ch2, sk next sc. Sc in next sc) across, leaving the last 20 sts unworked.
R5: Ch1, turn. Sc in next ch2 sp. (Ch2, sc in next ch2 sp) across. Sc in last sc.
Rep R5 until you have 1 ch2 sp.
Last Row: Ch1, turn. (sc, ch1, sc) in ch2 sp. Sl st in next st.
Fasten off.
HAPPY CROCHETING

Kaynak
Hiç yorum yok:
Yorum Gönder