Yapımı içeride...
Could it be!?
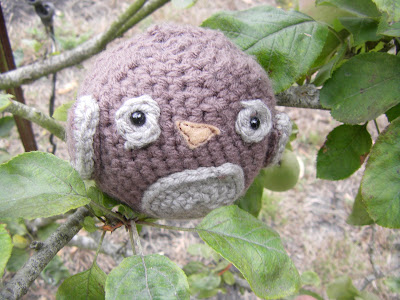
Yes. The long promised owl post is finally here.
Adorable Owl Amigurumi (Sachet)
Supplies:
1. 4.00 mm hook
2. Worsted weight yarn in two colors. (I used Impeccable Grey and Brown.)
3. A small piece of felt
4. Two small black safety eyes.
5. (Optional) Lavender, or whatever other sachet herbs or potpourri you wish to use, in a small bag or pouch that has been sewn shut.
TUMMY:
Chain 2, in alternate color (grey)
Row 1: Sc 6 into furthest ch from hook, join with a sl st (6)
Row 2: Sc 2 into each st around (12)
Row 3: *Sc 1 in first st, sc 2 in next stitch.* repeat from * to * around. (18)
Row 4: *Sc 1 in first 2 stitches, then sc 2 in the 3rd stitch. * Repeat from * to * around. (24). Bind off, and weave in ends.
WINGS:
Chain 2, in body color (brown)
Row 1: Sc 6 into furthest ch from hook. Join with a sl st. (6)
Row 2: Sc 2 into each st around. (12)
Row 3: *Sc 1 in first st, sc 2 in next stitch.* repeat from * to * around. (18)
Row 4: *Sc 1 in first 2 stitches, then sc 2 in the 3rd stitch. * Repeat from * to * around. (24)
Row 5: For a cute wing accent as pictured, switch to alternate color here. Then, sc half way around the circle. Bind off and weave in ends. (30)
Fold wings in half to form semi-circles. Sew around the semi circle to hold it in place.
EYE CIRCLES:
Chain 2, in alternate color (grey)
Row 1: Sc 6 into furthest ch from hook, join with a sl st (6). Bind off and weave in ends. Make 2.
BEAK: Cut a small triangle out of felt.
BODY
Chain 2, in body color (brown)
Row 1: Sc 6 into furthest ch from hook, join with a sl st (6)
Row 2: Sc 2 into each st around (12)
Row 3: *Sc 1 in first st, sc 2 in next stitch.* repeat from * to * around. (18)
Row 4: *Sc 1 in first 2 stitches, then sc 2 in the 3rd stitch. * Repeat from * to * around. (24)
Row 5: *Sc 1 in first 3 stitches, then sc 2 into the 4th stitch. * Repeat from * to * around. (30)
Row 6: *Sc 1 in first 4 stitches, then sc 2 into the 5th stitch. * Repeat from * to * around. (36)
Rows 7-8: Sc in each st around (36)
Row 8: *Sc 1 in first 5 stitches, then sc 2 into the 6th stitch. * Repeat from * to * around. (42)
Rows 9-19: Sc 1 in each st around. (42)
At this point, the owl’s body should be over half finished. If you haven’t made the other parts of the owl yet, now is the time to do them. I recommend sewing them onto the body with a needle and thread at this point in the body because it is so much easier than doing it later.
Row 20: *Sc 1 in first 5 stitches, then sc2tog in the 6th stitch. * (36)
Row 21: Sc around. (36)
Row 22-End: Sc 1, Sc2tog around. Repeat until the hole at the top of the head is closed.
The ending above is a little bit sudden, but I am always so impatient to be done! If you want your owl to have more of a rounded head than the one pictured, you can instead crochet as follows:
Row 22: *Sc 1 in first 4 stitches, then sc2tog. * Repeat from * to * around. (30)
Row 23: *Sc 1 in first 3 stitches, then sc2tog. * Repeat from * to * around. (24)
Row 24: *Sc 1 in first 2 stitches, then sc2tog. * Repeat from * to * around. (18)
Row 25: *Sc 1 in first stitch, sc2tog. * repeat from * to * around. (12)
Row 26: Sc2tog around (6)
Row 27: Sc2tog around. (1) Bind off and weave in ends. Done!hey
Hey Ravellers! I know you are probably here to just grab the pattern and scram, but I hope you might consider checking out some of my other posts to see what I am all about, and if you like those, consider following my blog. Thanks!
Kaynak burası.


Hiç yorum yok:
Yorum Gönder