Yapım aşamaları içerde:
flower pot - part one
So let's start right along:
here's the first part of the pattern
the pistil and stem
start with a nice (pale) yelllow
1 -- make a double ring with 6sts
2 -- m2 x6
3 -- (m2, sc1) x6
4 -- sc1, (m2, sc2) x5, m2, sc1
5 -- (m2, sc7) x3
6 -- sc4, (m2, sc8) x2, m2, sc2
make 1 row
change color to green
make 1 row
9 -- (sc2tog, sc3) x6
10 -- (sc2, sc2tog) x6
11 -- (sc2tog, sc4) x3
make 1 row
13 -- sc2tog x7, sc1
make 35 rows (8sts), or as long as you would like the stem to be
stuffing: start stuffing when you have made a few rounds of the stem (not too many though); stuff the pistil pretty tight, I tend to overstuff, but when stuffing the stem don't stuff so tight the filling might shine through
don't BO yet - cut yarn with app. 2m (3 arm's lenght) tail
I'm working with a 3,5 mm (E) hook and a tight tension, this will create a pistil/stem of about 18 cm/ 7 inches
yarn: catania from schachenmayr
stuffing: poly fibrefill
![[fp+pistil+stem+004.JPG]](http://3.bp.blogspot.com/_eLjmFKUsDSw/R_jbFoVa5YI/AAAAAAAAAKM/r_6Q7rJZ_Qg/s400/fp%2Bpistil%2Bstem%2B004.JPG)
flower pot - two, the leaves
this is so exciting I've already finished the leaves
but before I give you the next part of the pattern, the leaves, let me show you why everything started
this is the clover that died in the dry light of the burning sun over easter holidays -- poor clover
nevertheless, let's get back to happier things
big leaves for a beautiful flower
leaves (N3,5)
extra, large
make 2
1 -- make a double ring with 4sts
2 -- sc1, m2, sc2
3 -- sc2, m2, sc2
4 -- (sc2, m2) x2
5 -- (sc3, m2) x2
6 -- (sc4, m2) x2
7 -- (sc5, m2) x2
8 -- sc5, m2, sc6, m2, sc1
9 -- sc6, m2, sc7, m2, sc1
10 -- sc7, m2, sc8, m2, sc1
11 -- sc8, m2, sc9, m2, sc1
make 3 rows
15 -- (sc9, sc2tog) x2
16 -- sc1 and pM to start a new round, don't turn
17 -- (sc8, sc2tog) x2
18 -- (sc2tog, sc5, sc2tog) x2
19 -- (sc2tog, sc3, sc2tog) x2
BO -- cut yarn with app. 16inch/ 40cm
![[fp+leaves.JPG]](http://3.bp.blogspot.com/_eLjmFKUsDSw/R_o5KIVa5aI/AAAAAAAAAKc/wyoMtEfS42k/s400/fp%2Bleaves.JPG)
flower pot - part three, the petals
first flower nearly finished, eight petals made and only assembling left to make it a "real" flower ^_^
remember not to join rounds, it's only continuous crocheting, always spiralicious, never turn
petals (N3,5)
extra, make 8 (maybe 10)
1 -- make a double ring with 6sts
2 -- m2 x6
3 -- (sc4, m2, m2) x2
4 -- sc5, m2, m2, sc6, m2, m2, sc1
5 -- sc7, m2, sc9, m2, sc2
6 -- sc8, m2, sc10, m2, sc2
make 2 rows
9 -- sc8, sc2tog, sc10, sc2tog, sc2
10 -- sc8, sc2tog, sc9, sc2tog, sc1
11 -- (sc8, sc2tog) x2
12 -- sc1 and pM to start a new round, don't turn
13 -- (sc5, sc2tog, sc2tog) x2
14 -- sc1 and pM to start a new round, don't turn
15 -- (sc3, sc2tog, sc2tog) x2
BO -- cut yarn with app. 16inch/ 40cm
![[fp+petals+006.JPG]](http://3.bp.blogspot.com/_eLjmFKUsDSw/R_zdXoVa5cI/AAAAAAAAAKo/3wK3fNtS_m0/s400/fp%2Bpetals%2B006.JPG)
for the next flower I'm thinking of a flower quite like this one, only a little smaller and with thinner petals, maybe even with two-colored ones
but before musing on the next blossom I should assemble this one first, mmmh . . .
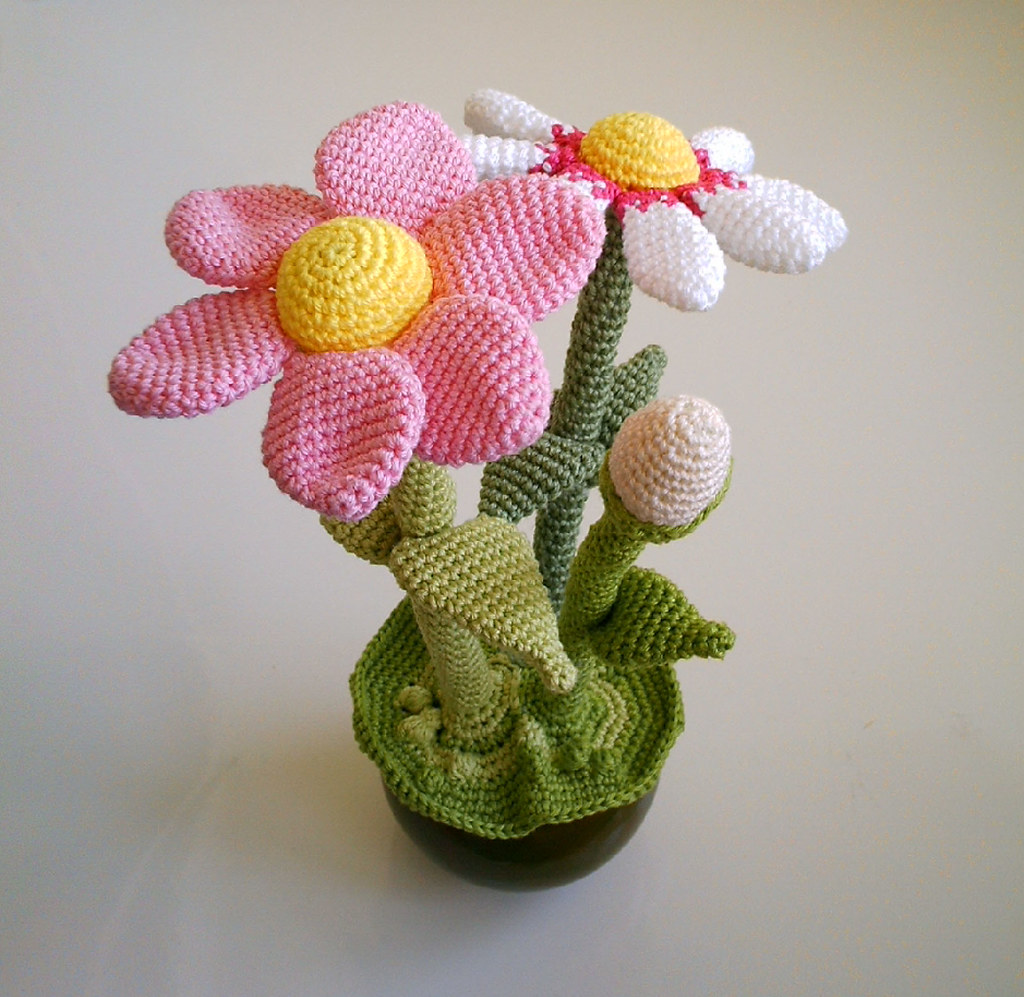
flower pot - part four, medium flower
![[flower+pot+M+L+008.JPG]](http://4.bp.blogspot.com/_eLjmFKUsDSw/R_9_dZXJspI/AAAAAAAAAKw/wyFC1AdyZyM/s400/flower%2Bpot%2BM%2BL%2B008.JPG)
last evening and even today in my office (shame on me) I made this new pistil and stem and two petals (yeah!) for a medium sized flower. I like the gradient from white to pink of the petals, this is a little delicate to make, but I would give it a try, it's not that hard. The pattern nevertheless doesn't mention the change of colors, it's in the note below, how to make the gradient.
I also didn't attach the petals of the first flower, I don't like assembling, but I would add four 'upper' petals and four 'below' petals, so they're overlapping each other, hope you understand what I mean.
Pattern - medium sized flower: pistil plus petals
pistil and stem (N3,5)
start with a nice (pale) yelllow
1 -- make a double ring with 6sts
2 -- m2 x6
3 -- (m2, sc1) x6
4 -- (m2, sc5) x3
5 -- sc4, (m2, sc6) x2, m2, sc2
make 1 row
change color to green
make 1 row
8 -- (sc2tog, sc2) x6
9 -- (sc2tog, sc1) x6
10 -- sc2tog x2, sc1, sc2tog x3, sc1
make 30 rows and BO
stuff while adding stem rows, don't put to much stuffing into the stem, it tends to shine through here
petals (N3,5)
extra, make 6 (?)
1 -- make a double ring with 6sts
2 -- (sc1, m2, m2) x2
3 -- sc3, m2, sc4, m2, sc1
4 -- sc4, m2, sc5, m2, sc1
make 2 rows
7 -- (sc5, sc2tog) x2
8 -- make 1 row
9 -- sc1 and pM to start a new round, don't turn
10 -- (sc4, sc2tog) x2
11 -- make 1 row
12 -- sc1 and pM to start a new round, don't turn
13 -- (sc3, sc2tog) x2
14 -- make 1 row
BO -- cut yarn with app. 16inch/ 40cm
NOTE: to make a gradient, add different colored yarn in round 11, now make the row but with changing colors for each stitch, in round 12 cut the first color and continue working with your new yarn.
Yapım aşamaları burada anlatılmış.
Çok şirin olmuş, tam benlik. :)
YanıtlaSilEllerinize sağlık.
Rica ederim beğenmenize çok sevindim :)
YanıtlaSil